About Me

My photo
Welcome to my crazy little world of beauty!! I love makeup, skincare & anything that makes you smell or look good. I have a serious shopping problem so I shall mostly be blogging about things I have purchased, reviews, tutorials & maybe a few beauty related tags. If you have any requests, anything you would like me to purchase and review or any tutorials, just ask! ♥Hope you all enjoy my blog♥

Monday 20 January 2014

Classic Red Lip.

Hello! Today is my all time favourite look, my Classic Red Lip! I love this look, it's so beautiful and timeless!I'm doing my foundation and concealer the same as I did in my foundation routine. Because It is taking up so much room I'm not going to do my foundation and concealer in every blog. 

So, starting with Bronzer, here we go!


Using the side of the Brush makes it so much easier to sculpt out the cheek bones. Once the product is on use the tip of the brush to blend it out. 

                                        I used quite a heavy sculpt with this look as a Red lip can wash you out. 
I then used a blending brush to contour my Nose. 

I then used Professional Eyebrow Pencil in Dark Brown to fill in the gaps of my eyebrows and add a small arch. 
When I finish filling in my brows I use a Small Arched Shadow Brush and go over my eyebrows to smooth them out and take away and harsh lines. 

For the lid you can use any Light, Matte Colour, I used Foxy from the Urban Decay Naked 2 Palette. Pack this onto the lid using a Flat Shading Brush.


In the crease use whatever Matte bronzer you have just to shape the eye. I used my Bourjois Chocolate Bronzer. I used the Urban Decay Fluffy Brush that comes with the Naked 2 palette. It doesn't have to be neat just add some depth to they eye. 


 Now, take a Matte Black Eyeshadow the line both lash lines, I used Urban Decay Blackout and smoke it out with a Small Pencil Brush. This adds thickness and a line to make it easier with the application on liquid eyeliner. 


Add quite a thick line of eyeliner for this look and a small wing. To do this I rest my finger on my cheekbone to keep my hand steady and make it easier. I use, Rimmel Exaggerate Liquid Liner and add a Black Eyeliner to the tideline. Whilst I wait for this to dry I redo my Concealer with my Wake Me Up.


I saw this mascara in Superdrug yesterday and had to buy it! This is the only mascara I use when I was in school. It is amazing! 

It's Rimmel Sexy Curls. I really do recommend this mascara. It's amazing for top and bottom lashes! 

For my blush I used Rimmel Match Perfection Blush in Medium. I never took a picture of this because as I got it out of my face box I dropped it on my Bedroom floor and it all broke into little pieces. 
I start on the cheek just under the pupil and tap it up to the temple. 

Now take your favourite highlighter! Mine's Benefit 10 Duo. I'm not a big fan of the Bronzer in here but the highlighter is perfect! Add this the the tops of the Cheekbones, Nose, Forehead, Chin and Cupids Bow. 


Now the exciting bit! LIPS! I used Rimmel Exaggerate Full Color Lipliner in Red Diva to line my lips and fill them in. I went slightly over my lipline as i have small lips. 
Then over the top I used Rimmel Vinyl Gloss in Red Ginger. I added this on top of the lip liner and buffed all the lip with a lipliner brush. 
I forgot to take a picture of this but I put concealer onto my lipliner brush to go around the outside of my lips and make my lips neater and sharper. 

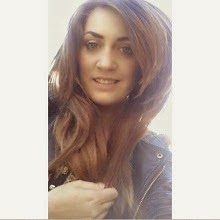
Now we have our gorgeous Classic Red Lip! 

Hope you enjoyed this tutorial and try it out! 
Let me know what you want to see next. 
Thank you so much to everyone who has took the time to read my blogs! 
Loves xo


Friday 17 January 2014

My go to Makeup this Winter!!

Hey Dolls!

As I said the other day I'm going to be doing a tutorial using the Revlon Decadent Quad. I teamed it with MAC Angel because I absolutely LOVE this lipstick! It is one of my all time favourite lip colours! This is also my 'go to winter makeup'.
So... On with the tutorial!

Always start with a clean face. Moisturise and clean your skin before starting any makeup look!


I have recently fell in love with the Revlon ColorStay I use it in Natural Beige It has amazing coverage (light to medium) and is very easily buildable. I also don't need to powder with this as it has quite a Matte finish.

I apply this all over my face in little dots with my fingers and the go back in and buff it all out with a Real Techniques Buffing Brush, I do have to work fairly quickly with this foundation as it sets quickly.

I then move onto my brows (finally got a new brow pencil!). Using the Rimmel Eyebrow Pencil in Dark Brown with little flicking motions I fill in the gaps in my brows and also try to add a little arch as my don't naturally have one.
I then go back in using any small angled brush it can either be clean or with a bit of a matte Brown eyeshadow and blend it all in so they don't look so drawn on and sharp. It makes a huge difference!


On my eyes I firstly use MAC Retrospec (left of the MAC palette) all over the lid on a Flat Eyeshadow Brush concentrating on the tear duct area.

I then take the Brown and Gold colors from the Revlon Decadent Quad on a Real Techniques Base Shadow Brush and put this into my crease using a window wiper motion.
Now, using any Small Blending Brush blend all the harsh lines out.
Using a Small Angled Brush (sorry just realised you can't see the angled brush in this photo, I'm using the Elf Small Angled Brush) take the Dark Brown under the eye and add any brown eyeliner to the water line and tide line. I just used my eyebrow pencil.
Using any brush you find easiest use the lightest Pink shade and add it to the brow bone.

Now using the Rimmel Exaggerate Liquid Eyeliner and add a small wing.

 I have also found an old mascara I forgot I had and fell in love with it all over again. MaxFactor False Lash Effect. It gives such a lovely effect to the lashes!
Curl the lashes and add this mascara.


Using Rimmel Wake Me Up concealer, conceal under the eyes and
also use it as a high lighter down the bridge of the nose, the forehead, cupids bow and chin. I blended all this with my fingers. Now cover any blemishes and use the Real Techniques Deluxe Crease Brush to blend all the concealer in.


As I'm so pale lately I NEED to bronze up my skin. I should just stop being lazy and fake tan but it takes so long! I may start experimenting with fake tan... Anyway!

Bronze under the cheek bones, temples, forehead and jawline using Bourjois Bronzing Powder on a Avon Face Brush. 


Now my favourite part... Lips!!

I lined my lips with Rimmel Eastend Snob taking it onto my lips a bit as a base and then put my favourite lipstick MAC Angel on top. You can add a clear gloss if you like but I personally like it without.


Now you're done!!
I hope you enjoyed this tutorial!
As I was saying during the tutorial, I may start experimenting with self tanners. If you have any you think I should try or want me to test out for you, let me know in the comments.
Either Monday or Tuesday next week I'm going to be doing a Classic Red Lip makeup look!
Let me know what you think of my Blog! Thanks for reading guys!
Loves xo


Wednesday 8 January 2014

Natural Everyday Makeup for School/Work.

Hey dolls!
So today I thought I'd do a blog on a quick makeup for school/work. Hope you all enjoy!

           Foundation and Concealer. 
If you're in school and don't really need foundation please, don't use it! It will only give you bad skin by blocking your pours.
If you do need foundation, start with using Rimmel Wake Me Up, I'm using the shade Soft Beige. Take this on a Real Techniques Stippling Brush. I use this because it doesn't give a lot of coverage as it doesn't pick up as much product. Push the foundation into the skin and blend with small circular motions. 
Now, using the Rimmel Wake Me Up Concealer, put 3 dots under the eyes, around the nose, on the forehead and on any blemishes. Blend this in using the finger. 

                                                                     Eyes. 
Fill in the brows using a Brow Pencil. I'm using the Rimmel Professional Eyebrow Pencil in Dark Brown (I know, I need to pick up a new one!). Only use this to fill in any gaps you have in your eye brows using small flicking motions. 
Using the Naked 2 Palette, take Bootycall on a Flat Shading Brush and push it all across the lid (you can skip this and just put your Matte Bronzer through your crease to give it a more defined look). Now take Tease on a Buffing Brush and push it through the crease. 

To make the eye lashes look thicker push Blackout on the Real Techniques Detailer Brush and push it as close to the lash line as you can. 
Curl the eye lashes and add one coat of Maybelline The Falsies Mascara.

Bronzer, Blush & Powder. 

Take your Boujois Bronzing Powder on a Avon Face Brush and 
apply it to the tops of the cheeks, down the nose, through the temples, across the forehead and down the neck. 
Now using the Boujois Blusher in Rose Pompon on a Real Techniques Contour Brush wipe this across the apples of the cheeks.
If you have dry skin you can skip powdering, if not, Take Rimmel Stay Matte Powder and push it into your T-Zone or wherever you are oily.

Lips. 
First, line the lips with the colour closest to your natural lip colour. For me, this is Maybelline Colorsensational in Sweet Pink
Then go over the lips using a light dabbing motion with Rimmel, Latino.
To finish the look and add a bit of shine to the lips sweep on a bit of Avon Plump Pout in Pink Pucker. 


Now we have a completed look and you're ready for School or Work!
I hope this helped speed up your mornings!
Tomorrow I'm going to be doing a blog about my hair and what products I use!
Loves xo

Tuesday 7 January 2014

Brown Smokey Eye Using Naked 2

Hey Dolls!
So, as you may have guessed from the title I'm doing a smokey eye using the Naked 2 palette today!
So sorry this blog has gone up so late today. I had my friend Demi round to do a refit with my Micro Bond extensions and it took 6 hours!! I will be doing a blog on my extensions soon.
I'll stop rambling now and get on with the makeup!!

Eyes. 

Before I start on my eyeshadow I make sure I have a clean base. I don't do my foundation till after my eyes are finished incase of any fallout. 

Instead of using a primer, I use Concealer because I find my eyeshadow sticks to it better (and it's cheaper). I use my Natural Collection Cover Up Cream in Fair. I apply two dots under my eye and two to my eyelid and blend with my finger. 

To help with the application of my eyeshadow, I use 2 small pieces of tape and put them on the outer corners of my eyes from my water line up towards the end of my eyebrow.
Then apply Tease using a Real Techniques Base Shadow Brush 
and take it though the crease to make all the eyeshadow easier to blend at the end.
On the inner half of the eye concentrating on the tear duct use Bootycall on a Flat top brush.
Using the same brush apply Chopper to the outer half of the eye taking it into the crease a little.
Now, using a Real Techniques Base Brush again apply Snakebite the the outer V using the tape as a guide line into the crease.

Now, take the Blending Brush that comes with the Naked 2 Palette and blend out the harsh line above the crease.
Using any Black Eyeliner you have line your tide line.
Take Blackout on the other end of the brush that came with your Naked palette and push the eyeshadow as close to the lash line as possible.
Off with that tape! Wipe under the eyes where there is any fallout and reapply your moisturiser.
Using Snakebite on the Real Techniques Brow Brush apply it to the outter 3/4 of the lower lash line.

Now, let's add a wing!

To do winged eyeliner I find it a lot easier using Liquid Eyeliner. 

First, make a line from your tear duct all the way to the end of the lashes.
Then make another small line from the bottom lash line up towards the brow bone.
Now, join up both lines and fill in the middle.
If needed join up the wing with the lash line.


Before curling the eyelashes, high light the brow bone with Foxy using any small brush and do foundation, concealer, bronzer and blusher to give the liquid eye liner time to dry.


Now curl the eye lashes, add mascara and lipstick! I think Rimmel, Drop Of Sherry looks lovely with this look.


And we're done! 
I hope you all enjoyed this look today! Let me know of any other looks/tutorials or reviews you'd like me to do. 
Loves xo


Monday 6 January 2014

Foundation, Concealer, Blush, Bronzer, Highlight & Powder Routine!

Hey Dolls!
So, as I said on Saturday, I'm doing my Foundation Routine today.
I have used a LOT of foundations over the last few years, high end always made me break out, although I've never tried MAC... I know! I need to get to MAC!
My foundation routine has been the same for the last few months. If it does change, I'll do an update.
So... Here goes!

Foundation. 
For my Foundation I'm going to be using my Rimmel Wake Me Up in Soft Beige. This foundation is perfect for this time of year as my skin is so dull and breaking out.
Wake me up has light reflecting pigments in, so it does make you look more awake!
First, I put about a pump and a half onto the back of my hand and blow on top of it to warm it up and flatten it out to help with a more even finish. I then use my Real Techniques Buffing Brush to push (or stipple) it into the skin. Lastly, I like to use the same brush to buff all the foundation on my face and neck out to make sure I have a flawless even finish!

Concealer 
I also use Wake Me Up Concealer in the shade Ivory, it really does brighten up your under eyes. I use this a shade or two light as I also use it as a highlighter.
I use the Doe Foot applicator that comes with the concealer to apply it in Triangle shapes under my eyes and forehead. I also apply this to the bridge of my nose my cupids bow and my chin. I then use my ring finger to blend in under my eyes as you can see in the bottom left picture, it really does wake your eye up! I then use my Real Techniques Deluxe Crease Brush to blend out the rest of my concealer, if I'm left with a few lines from the brush I use my ring finger and use a patting motion to blend it in.

Contour 
For contouring I use my Bourjois Chocolate Bronzer. At first this was a big dark for me but the lighter one wasn't showing up on my skin. I found with a lot of blending it does eventually give a nice natural finish. I apply this with my brush I got with my Benefit 10 Bronzing and Highlighting powder. I take a good amount of product onto my brush and apply it where you can see (or not) on my top right picture, in the hollows of my cheeks, (you can find the hollows of your cheek by either doing the 'fish face' and it is where your cheeks dip in. Or, you can feel for the bottom of your cheekbone then apply it from the top of the ear following your cheekbone to just under your pupil) I also apply it up my temple, on the both sides of my forehead, down the sides of my nose, on the end of my chin and my jawline. Once this is all applied, it will more than likely just look like you have lines all over your face! I then take my Avon Face Brush and take my time to blend it all in using circular motions. Lastly, I like to go back in with a little product on my Avon Face Brush and lightly go over where I contoured to give a more definition to the face. 

Blush, Highlight and Powder. 
 As these 3 don't take too much explaining, I thought I'd put them into the same category.
Firstly, Blush! I used to go crazy over the top with my blush and end up leaving my house looking like a Clown! Until... I stopped putting the product straight onto the apples of my cheeks. I love my Pink Blushers so today I used my Rimmel in Live Pink on a Real Techniques Contour Brush. Pick up a little bit of blusher and apply it starting at your temples, blend it down to the top of your cheekbones and stop just under your pupil, if you use too much product go over it with the same brush you used for your foundation. 
I then used the highlighting powder in my Benefit 10 Bronzer and Highlighter Duo on the same Real Techniques Contour Brush, add the highlighter to the top of the cheek bones, down the bridge of the nose, middle of the forehead, cupids bow and chin. 
Then lastly, powder! Because of having oily skin I do use a lot of powder, especially in my T-zone. I pick up a good amount of product on my Avon Face Brush and pat it all into my skin. I always avoid using any swirling or circular motions as this will just move around the products that are already on your face. 

  And... Done! This is Me after my Foundation routine! I am happy to answer any questions you guys have! Let me know what other Tutorials or Reviews you want. Please don't forget to like my Blog and Follow me! I'll follow you back! Loves xo

Saturday 4 January 2014

Skin Care Routine.

Hey Dolls!
I am always hunting for different products to throw into my skincare routine. I have tried high end products (this usually ends in me having a big strop about spending loads of money on a product that just makes me breakout) and high street. I finally settled on my final skincare routine around a month ago (no doubt it'll change soon). So... Here's my current skin care routine!

Morning Routine.
I like to keep my morning routine quite quick and simple as I've usually woke up too late so I'm in a rush!
 I have quite oily skin so as you can imagine, I wake up feeling horrid! Firstly, I like to use my Johnson's baby wipes to wipe away any oil in my skin, it makes a huge difference!
Then, I use my trusty Lush Tea Tree Water Toner Spray. I put this on with a cotton pad all over my face, avoiding under my eyes and eye lids. As this space is so sensitive I don't like to put many products there. I like to give that time to work as it is a antibacterial and antiseptic. Next, I brush my teeth, whilst doing this I also like to brush my lips. If brushing your lips is a bit harsh for you, you can mix together some Honey and Brown Sugar and rub that into your lips.
After brushing my teeth (and lips) I put some lip balm on. Remember ladies! Lip balm is for healing chap stick is for protecting!
Then I move onto moisturising. At the moment I've grown quite fond of Garnier Moisture Match for combination to oily skin. I only use this on my face avoiding my eye area again. It is so light and instantly makes my skin feel fresh. Using this under my foundation really helps with my midday oily breakout!
Lastly, my eyes. I only started using eye cream the last few months. I use Anew reversal Illuminating eye system. I firstly use the cream under my eye and on my eyelid, then on top of it is another cream that is much lighter and has a pinky undertone. I use this under my eye and I'm done!
Johnsons baby wipes - 0.99p - Boots
Cotton pads - £1.00 - Tesco 
Garnier Moisture Match - £5.99 - Boots
Lush Tea Tree Toner Water - £3.99 for 100g and £7.50 for 250g - Lush
Anew Reversalist Illuminating Eye System - £15.00 - Avon 

Night Time Routine.
My night time routine is basically the same so I wont bore you writing the same thing! The only difference is, to take my makeup off, Johnson's baby wipes were a bit harsh on my skin. Instead I use a cold cream cleanser and a foam cleanser. 
I only came across the cold cream cleanser last year. I bought it because I just thought it was a cream so, I was using it as you would normally use a cream (durr!) I couldn't understand why I was breaking out... Then I read the instructions!
I use the Cold Cream Cleanser twice. The first time I use it I put it all over my dry skin and rub it all in. I then add a little warm water and carry on rubbing it in. It then turns into a milky cream. I do this for a good 2 minuets then wash it off with a flannel. I then repeat this, just to make sure all my makeup is off. After using my Cold Cream Cleanser I use my Foam Cleanser. I put this on my damp face and rub it all over until is all foamy. Again, I do this for a good 2 minutes to make sure I am really working it into the skin.
When all this is done, I splash my face with cold water to close my pores and pat my face dry with a soft towel. I then go onto using my Tea Tree Toner Water, Garnier Moisure Match and Anew Reversalist Eye Illuminating System. Then I put on some lip balm and I'm ready for bed!
Anew Reversalist Renewal Foaming Cleanser - £8.50 - Avon 
Pond's Cold Cream Cleanser - £4.49 - Boots

Thank you for reading my Skin Care Routine! Let me know in the comments if you have any products you think I'd like!
My next blog will be up Monday. I shall be showing you my current Foundation Routine!
Loves xo


Friday 3 January 2014

Soap & Glory Review.

Hey Dolls! Welcome to my first Blog!

After Christmas my Boyfriend and I went shopping to spend our Christmas monies!
I've wanted to try the Soap & Glory products for a while now and thought this was the perfect opportunity.
I stood in Boots for a good 40 mins trying to decide what products to try out first. After sniffing and sticking my fingers in all the products, I finally settled on; Sugar Crush Fresh & Foamy Body Wash, Smoothie Star Breakfast Scrub and Smoothie Star Lightly Whipped Body Buttercream. OH MY GAWD! They smell absolutely gorgeous.

Sugar Crush Fresh & Foamy Body Wash.

This was actually the first product I smelt and I absolutely loved it!


It has a gorgeous fresh, Lime smell to it. It is supposed to be an 'energy boosting Citrus conditioning body wash'. I haven't felt energised after using it but I have felt super soft!

When I have a shower I usually pump/squirt so much product onto my puff ball but with this I only need one pump. It turns so foamy so fast!
This was £6.50 from Boots. I definitely recommend this!

Smoothie Star Breakfast Scrub.
Yes! This smells just... Mmmm. When I first smelt it I thought it smelt a lot like Creme Brulee then when I used it in the tub, hints of Banana started coming out making it smell more like Banofee Pie (who doesn't like Banofee Pie?). As soon as I started using it, I could feel it working. It's not like any other exfoliator\scrub I've used before. It has more of a sugar feel to it and I could feel the difference in my skin after the first time I used it. After using it I didn't feel as though I needed a moisturiser. My skin was so soft!
This was £8.00 from Boots. Highly recommended!

Smoothie Star Lightly Whipped Buttercream. 
I wasn't sure of the smell of this at first, I thought it was a bit strong and sickly until the Sales Assistant in Boots told me to rub it onto my arm and smell it. It has a much lighter smell to it on my skin it has a very light Almond and Vanilla smell to it.
I also didn't like the way it made my skin feel after using it either. It's very thick and left my skin feeling sticky and greasy. As it is quite thick, it made me feel so hot! I do like it after it has been on my skin for a few hours.
I probably won't be repurchasing this but I do recommend it to anyone with dry skin. This was £10.50 in Boots.


Thank you for reading my review! Let me know what you think. Constructive criticism is very welcome!
Loves xo